Showing posts with label home. Show all posts

Tuesday, March 25, 2014

How To Make A Wine Rack Above The Fridge

You know that useless cabinet above your fridge that's too far back to access easily? So you either have crap in there or nothing at all? Yeah, we all have one.

I decided to build a wine rack in ours. I know storing wine above the fridge isn't the ideal spot, but our fridge emits little to no heat, and that space is so useless, that I just had to do it. I think most people don't advise storing wine on top of the ACTUAL fridge (because it shakes the wine, and it is warm).

wine storage
 
Anyways- if you're like me and think this is a good idea, read on... (also, please note: this tutorial is for a cabinet that measures 12" deep, 34" wide and 11" tall.)

First, remove the doors and hardware. Our cabinet had a bar in the middle of the space, which was literally held in by 2 small wooden pegs. Josh easily snapped them off/sawed them off with a handsaw.

Next, we primed and painted the inside because we were painting the rest of the cabinets and this was part of the remodel. 

Next, you need to purchase this wine rack kit (actually, go ahead and order it as soon as you decide you're doing this project, so it arrives ASAP). We exhausted ALL our options to actually build this ourselves, but with a rectangle space like this, it's nearly impossible to make with the tools we have.

Once your kit arrives, measure and saw off any excess. I wanted the middle "braces" to be somewhat hidden behind the cabinet lip, so Josh sawed off about 1-2" from the width of those.

Next, if applicable, prime and paint the wood. I did 1 coat of each and was satisfied with the outcome.

Next, install and stack yo wine!!!

I looooove the way this turned out, and I looooove that our wine isn't just sitting around taking up space on a countertop.

If you try this, please please please let me know how it goes!

Linking up with: The Dedicated House, Hope Studios, A Savory Feast, Lewis Lane Designs

Monday, March 17, 2014

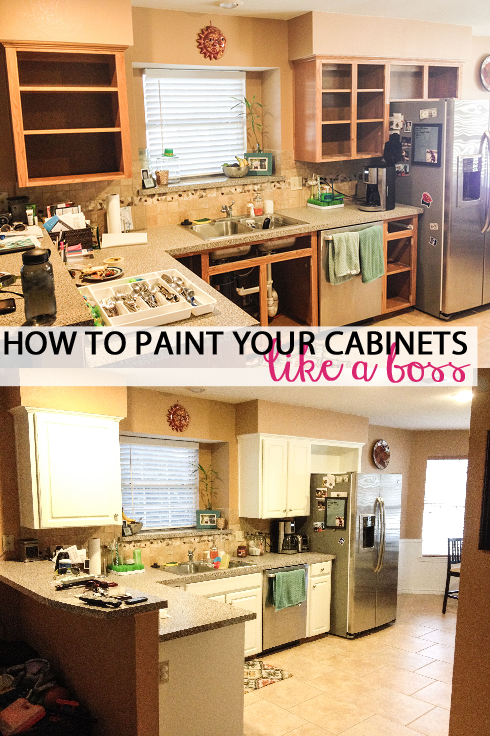
How To Paint Your Cabinets [like a boss]

So it finally happened. I talked Josh into painting our kitchen cabinets! And we actually did it!! Yayy!!!!

LOOK how good it turned out... Ahh I'm just so obsessed with this room now!

How to paint your cabinets

The process is very time consuming, tedious and messy, but it is not hard. I repeat it is not hard. In all seriousness, I probably wouldn't make this your first home improvement project, but you can definitely do it!!!

I'm going to give you step-by-step instructions on how we did it. But let me start off by saying I am no DIY expert. In fact, my dad (and my better judgement) told me not to do this. Hahahah!! There are a million tutorials online, all with a different process and materials. This is how WE did it. 

And also keep in mind that we have a toddler to wrangle care for, so most of the work was done during naptime and after he went to bed. 

From start to finish, this took us 14 days. 6 of which were drying days during which I did nothing. Sooo...I'm no math major, but I think that's 8 days of actual work (right??)...not bad for a remodel that will seriously turn your kitchen (or bathroom) from drab to fab!

In terms of budget, we spent around $150 total for all the supplies and paint. Again, a total score! Considering buying new cabinets or having someone else do them would cost a pretty penny $$.

Alright- what you've all been waiting for. The tutorial...

Step 1
Gather all your supplies. 
Here's a list of what we used:
Wood filler (Elmer's Wood Filler Max)
Mouse sander (Black & Decker)
80 grit sandpaper
Deglosser (Klean Strip Sander Deglosser)
Paintable white caulk
Primer (Zinsser 1-2-3)
2" angled paintbrush
Foam roller
Paint (Benjamin Moore Advance Paint in "cloud cover" in satin finish)
Various screwdrivers
Painters tape
Drop cloths
Putty knife

Step 2
Remove doors/drawers and all the hardware. Make sure you mark each cabinet opening and corresponding door/drawer and all the hardware, so you can install it correctly when you're done! We put tiny pieces of masking tape in each cabinet and then wrote the corresponding number under each door in the garage. And just piled all the hardware next to the number. 

How to paint your cabinets

How to paint your cabinets

Step 3
If you're replacing the hardware or if you have any nicks/holes in your cabinets, you'll need to fill the holes with wood filler and use a putty knife to scrape the excess off. Then let it dry.

Step 4
Sand, sand, sand. We used 80 grit sandpaper with a mouse sander and spent about 20 minutes on each door. Get in all the grooves and edges. You don't have to get every last bit of varnish off, but you want to rough it up real good. Sawdust will get everywhere. Plan accordingly. We sanded all the doors/drawers outside in the grass. When we sanded the cabinet boxes inside, I shut the door to the kitchen and put a towel under it, and used a big plastic drop cloth to close up the huge opening to the family room. Thankfully the weather was gorgeous that day, so I was able to turn off the ac/heater while sanding and Jacob spent most of the day outside. It was a MESS! But after lots of sweeping and vacuuming, it was cleaned up pretty quickly. Honestly. I suggest doing this part when the weather is nice and you can be outside. This is the messiest part.


How to paint your cabinets
 
How to paint your cabinets

Step 5
Degloss. I used a TON of old rags, squeezed a good amount on the rag, and wiped down the cabinets thoroughly after they were sanded. I wore gloves and replaced them a couple times throughout the process. You want to clean off all the sawdust and make a nice even surface for the primer to adhere to. We were able to sand and degloss all the doors, drawers and cabinet boxes in 1 day. I was shocked by that!

How to paint your cabinets

Step 6
Caulk. We had some separation between the cabinets and the walls, so we used a hefty amount of caulk to seal the gaps. P.S. Read the instructions to find out how long you should wait before painting. The stuff we got dried in 15 minutes!
 
Step 7
Prime. We started with the back of the doors, thinking that if when we turn them over to do the front and it scuffs a bit, it'll be the BACK not the front. ¿Comprende? Then when we were done with the backs and drawers, we moved to the cabinet boxes. When you're priming, you want to start with the angled paintbrush and get primer in all the groves and spread the primer around. Then take the foam roller and roll over the entire surface. You want to make an even surface. 

How to paint your cabinets

How to paint your cabinets

Step 8
Painting! Once your primer is dry (we waited at least 24 hours) you can start painting!! We did two coats, using the same technique as we did with primer. After painting the second coat on the back side, we let the doors sit for a full day before flipping them. After painting the second coat on the front side, when the doors and drawers were completely done, we let everything sit for 5 full days. You need to read your paint to see how long you should wait. This is so important- you really don't want to ruin all your hard work!

Step 9
After 5  l o n g  days of waiting, we re-installed all the hardware and put all the doors back on. This was an OMG moment, for sure!!!

How to paint your cabinets

How to paint your cabinets

I really wish I had better before pictures. I thought I had some from when we first moved in, but I can't find them?!?!

Anyways- I hope this post includes enough details and tips/tricks. If you have any questions, just post them in the comment section and I'll answer them as best I can!!!

Now that our cabinets are all re-installed, the doors/drawers do stick a little bit. I've heard that it could take up to 9 months before everything is seriously hardened. We'll see! I'll try to update this post in the future, once I feel like its done.

Good luck!!!!

Linking up with: Cherished Handmade Treasures, Not Just a Housewife, Hope Studios, Remodelaholic, House of Rose, Living Well Spending Less, The Dedicated House, A Savory Feast, Lewis Lane Designs

Tuesday, October 1, 2013

Master bedroom facelift

I have literally not touched anything in our bedroom, except for the sheets-obv, since we moved in. Everything is exactly the way it was after we first moved in. We painted the walls white, bought some nice furniture, hung some curtains, and that's it! Ugh! How boring!

I decided it was time for a little facelift, before baby #2 comes and life gets crazy again... I present to you, our new modern adult bedroom....


I am so pumped about how it turned out. I especially love how the room looks at night, all lit up. It almost has a little Kardashian-feel to it, which I promise wasn't intentional, but I'm digging it!


I found this beauuuuutiful fabric on FabricGuru.com and literally couldn't buy it fast enough. And to my surprise the entire bolt (18 yards) arrived TWO DAYS after I ordered it! Holy cow! I think I peed in my pants when it was delivered. I ended up decorating the entire room around this fabric. I'm usually pretty good at throwing in splashes of color, but I wanted to go very cool and calm in our room, so I'm sticking to blacks/greys/whites and a little beige/brown.


We have 4 windows in our bedroom, 1 bay window and 1 additional window, so I made all 8 curtains myself, and 2 matching throw pillows. My husband hates tons of pillows, he doesn't see the point in them when you're just going to throw them on the floor. He has a point, but I love the look of tons of different patterned pillows (when I actually make the bed).


Our furniture is oversized and dark (almost black) wood, so I like to keep the bedding light. I bought these cool ikat sheets in grey from Target. I generally like really soft sheets, not sateen, but just nice, soft, cool, cotton sheets. I think after a dozen washes, these sheets will be perfect! They are a little too crisp for me yet...even with lots of fabric softener and 3 washes. I'll keep y'all updated.


Because the nightstands are dark, I wanted lighter lamps. My goodness- lamps are the hardest thing to shop for! They are either adorable and super expensive, or cheap and look it. I am a mama on a budget here, so I'm looking for cute, expensive-looking and cheap. Haha! (good luck, right??) Well, I stumbled upon these gems at Target and fell in love with them! Actually, to be honest, I thought $45 was too expensive, so I kept looking... And soon realized that the exact same mercury glass lamps were going for $125-$250 at Restoration Hardware, Pottery Barn and Crate & Barrel. Sooo I quickly went back to Target and scooped up two of those bad boys before they were sold out! I also grabbed two of these shades while I was there. The website doesn't really do the shades justice- they have a linen-look to them, with a very subtle sparkle. Very pretty!

I currently have a plain white blanket on the bed, because its too dang hot for anything else,but once the weather cools down, I plan on buying this duvet and a lightweight down insert from Ikea.

I have also talked my sweet husband into installing DIY crown molding. Home Depot has an "easy no-cut" system, that looks pretty painless. Hopefully we can tackle that in November, when the weather cools down and our crazy life slows down for a sec (and we have a free weekend).

I hope you like it as much as I do!! Cheers!
 

Monday, May 7, 2012

Jacob's Nursery!

Jacob's nursery is FINALLY complete and I absolutely love everything about it! It turned out just as I imagined, and I really hope Jacob enjoys it as much as I think he will! :)

I can't wait to spend hours in that rocking chair, nursing, reading, napping and cuddling.
As hard as I tried to keep the nursery sports-neutral, I couldn't resist his first basketball.
Bookcase full of my old books, my sister's old rocking horse, and the shelf above the dresser has lots of our old toys from when we were babies (none safe to play with now, but they look cute).  Still waiting for the custom changing pad cover, but that will eventually go on the dresser!
I'd say he has plenty of clothing options...hopefully he doesn't grow like a weed and outgrow this stuff too quickly!
Figured I should also include a picture of his little corner in our bedroom, where he'll be sleeping the first few months he's home.  Complete with his first teddy from my Aunt Bobbie.

Thursday, March 29, 2012

Bathroom Remodel!

I've mentioned in a couple posts that my dad was up doing our master bath remodel, but I haven't really detailed it.  Honestly, it ended up being a lot more labor-intensive than I'd planned, but isn't that how all remodeling/housework goes??

To start, here's a list of all the things we did:
 1) Ripped out plastic shower insert, replaced with tile
 2) Removed the cultured marble tub surround, replaced with tile
 3) Removed the cultured marble counter tops, replaced with granite
 4) Removed the vanity, replaced
 5) Removed mirror, replaced
 6) Removed light, replaced
 7) Painted

My dad is a tile contractor, and happens to be the handiest man I know, so he was able to do 99% of the work himself. (HUGE thanks to my awesome dad!!!)  The only thing he couldn't do was the glass shower door, for obvious reasons.

After 4 long weeks, we FINALLY have a working bathroom.  And let me just say, I absolutely loooove the outcome!

That being said, I highly discourage 6-month preggo women to start a remodeling project.  Plan ahead, and do the work before you get pregnant, or do it during your 1st trimester, or quit your job and focus on the remodel (haha).  Trust me on this one.  The added stress and pressure of having my house a total disaster, my parents living with us for 3 weeks, sharing a bathroom with 4 people, etc. nearly gave me an anxiety attack!  I really think it had something to do with our scare a few weeks ago. 

Here's a before and after shot, so you get a really good idea of the complete transformation that occurred.  I took the first shower in that spa shower last night, and it was delightful. :)

Friday, March 2, 2012

Rocker!

I just had to post a quick blog because I'm SO EXCITED!  We got the rocker yesterday and it looks beyond amazing in the nursery!!!  My sweet mother-in-law bought it for us, and originally it wasn't supposed to come in until early April.  But, she surprised me yesterday and said it came in early!  I am so excited about how great it looks in there.  I can definitely envision hours and hours of rocking in that chair!  Yayyy!!  Thanks, CoCo!!! :)  I put the cute pillow we bought at Canton on it - and it's like it was made to be there...

Monday, January 30, 2012

Nursery status

I haven't blogged about the nursery yet, mainly because we haven't done THAT much, but I wanted to give you an idea of what we're doing!

We painted the nursery "Whispering Wheat" by Glidden.  It's a really light tan - very warm and soothing.  I absolutely LOVE it!  Of course this picture doesn't really do it justice.
We bought the preppiest, cutest, most handsome bedding from Pottery Barn Kids, which I fell in love with as soon as I found out we were pregnant.  I'm afraid if we were having a girl, she would've been stuck with this bedding, too!  We got the quilt, bumper, crib skirt and curtains.  They should arrive this week and I cannot wait to hang the curtains!!
I originally picked-out a furniture set from Buy Buy Baby, which I loved, but it was a little pricey.  However, I found almost an identical collection at Babies R Us, which we're going to purchase tonight!! Woohoo!  I'm only getting a convertible crib (which, let me just say - what a genius idea!), combo dresser and night stand or bookcase (haven't found the perfect piece yet). 

My mother-in-law bought us a custom recliner and I can't wait for it to be delivered (early April)! It's the same color as the walls, microfiber (bonus) and super comfy. Josh & I were big "rockers" when we were babies, so I hope we make as many sweet memories with our babies in this recliner.  I will look similar to this one.
I plan on putting a large storage unit in the closet, with canvas bins for bibs, burp cloths, etc. and will put several shelves over the dresser/changing station for decorations and toys.  I'm hoping to find a decent size bookcase for toys and books, which can eventually be used as a nightstand.  Once the bedding arrives, I can start buying decorations and stuff.

So anyways, that's pretty much it!!  I'm so excited to see everything come together and can't WAIT to meet our sweet baby boy.