Showing posts with label domestikate. Show all posts

Wednesday, April 8, 2015

Recipe - no bake lactation bites

Since Judd's lip tie revision, I've been desperate to boost my milk supply. Not only to meet his new needs, but to replenish the freezer stash we pretty much used up completely.

I really liked these granola bars, but with the baking and cooling, they took too long to make (plus they kinda fall apart).

The recipe I'm sharing today was adapted from this original recipe

These are EASY NO BAKE bites. And with the cinnamon, they are TASTY! The recipe makes about 24 bites, which will last you a week. I eat about three a day and I've definitely noticed a difference!

no bake lactation bites

Ingredients
1 cup old fashioned oats
1/2 cup peanut butter
1/2 cup honey
1 cup coconut flakes
1/2 cup ground flax seed (flax seed meal)
1/2 cup mini chocolate chips
3 tbsp. Brewer's Yeast
1-1/2 tsp. cinnamon
1 tsp. vanilla extract

Directions
1) mix all ingredients
2) cover and put in refrigerator for an hour
3) roll into bite-sized balls
4) store in an airtight container in refrigerator

Wednesday, February 18, 2015

Essential oils - super allergy bomb

I have had several friends ask me about what essential oils I use, and since I've had pretty good success with several concoctions, I thought I'd share my experience here.

Today I am going to share with you my SUPER ALLERGY BOMB concoction using Thieves, Breathe Easier and Melaleuca. All through Eden's Garden.

super allergy bomb

Please note: I am not a doctor. These statements are simply my experience. Please do your research and use with caution.

I have used this on every member of my family and this stuff works! If you have a cold, snotty nose, cough, allergies, etc. this stuff is for you!

super allergy bomb

It's simple. Put 30 drops of each oil into a roller bottle and roll it directly onto the bottom of your feet, back of your neck and behind your ears. I do this simple topical application for myself, my husband and my 2 year old. I notice a difference almost immediately, although I cannot use this right now because Breathe Easier has peppermint in it which will dry out my milk supply.

FOR MY BABY, I put a carrier oil on his feet first. I use coconut oil. Then I roll it directly onto his feet. I do not put it on his neck because I don't want it too close to his eyes.

THAT'S IT! I know how debilitating allergies and colds can be for a family, so I sure hope this helps y'all!

Friday, January 16, 2015

Quinoa & chicken skillet

This recipe has been floating around Pinterest lately and it fits my no dairy or spicy food diet criteria, so I made it! I changed the original recipe a bit to add chicken and more flavor.

Quinoa & chicken skillet
 
Ingredients
1 tbsp. EVOO
1 tbsp. minced garlic
Chicken (I used pre-cooked fajita chicken)
1 can black beans
1 can corn
1 can rotel
1 cup quinoa (uncooked)
1 cup vegetable broth

Directions
1) Put EVOO and garlic in large skillet on medium heat and sautée for a minute or two. 
2) Add cooked chicken to skillet for a few minutes to brown. 
3) Add all remaining ingredients. Bring to boil. 
4) Reduce heat and simmer for 20 minutes (or until quinoa is cooked).

I ate this over a bed of lettuce with a bit of salsa on top. My husband and son ate it with cheese on top. Both ways are delicious and I can't believe my husband, the world's pickiest eater, likes this! Add it to the weekly rotation! :)

Monday, November 17, 2014

Recipe - crockpot potato soup

crockpot potato soup

My mother-in-law made this soup a week or so ago and it was so delicious, I had to take a stab at it!  Plus the weather here as been miserably cold, and there's really nothing else my pregnant self wants except soup.

She found the original recipe here, but she adapted it a bit. Below is our adapted recipe, which is so hearty, tasty and EASY! Easy is the key 'round here lately....

Ingredients
32oz frozen cubed hash browns
32oz chicken broth
10oz cream of chicken soup
4 slices bacon
1/2 onion, chopped
1 cup carrots, diced
4oz cream cheese, cubed
8oz velveeta, cubed
1 cup shredded cheddar cheese
salt & pepper, to taste

Directions
1) Place the frozen hash browns, broth, cream of chicken, bacon, onion and carrots in the crockpot.
2) Cook on low for 7-8 hours (or until the potatoes are tender).
3) An hour or so before serving, add in the cream cheese, velveeta and salt & pepper.
4) Once the cream cheese and velveeta are melted, you're ready to eat! Serve with shredded cheese and bacon on top! YUM!

I bought a take & bake boule from the grocery store, warmed it up and sliced it in half to make bread bowls. Seriously genius idea- it was so perfect!!

Saturday, October 11, 2014

Recipe - easy & delicious chili

I've been keeping this recipe from y'all. Mostly because it's delicious and in Texas, a good chili recipe is worth it's weight in gold. And could win you some serious awards. But, I'm gonna go against my better judgement, and trust that none of y'all will steal my recipe and enter it into a chili cook-off against me. ;)
 
 
You can easily add more chili powder, or even some cayenne, to make it spicier. Since Jacob enjoys eating the beans out of chili, we have to make ours pretty tame (although the flavor is on-point).

Ingredients
1lb. ground beef
1 medium onion, chopped
30oz chili beans
15oz dark red kidney beans, drained
15oz petite diced tomatoes
15oz rotel
16oz tomato sauce
1 tbsp. cumin
2 tbsp. chili powder

Directions
1) brown ground beef with the chopped onion
2) drain the kidney beans (do not drain the chili beans)
3) mix all the cans of stuff, drained kidney beans and ground beef/onions into crockpot
4) add seasonings
5) cook on low for 4 hours


We serve our chili various ways, I think this is a personal thing. I like mine frito pie style (with Fritos on the bottom, then chili, then cheese, and sometimes sour cream on top); Josh likes his with a shit ton of saltine crackers and cheese. On "special occasions" (think TX/OU or Halloween) I like to bake up some tater tots and serve the chili over those, with cheese.  

Honestly, any way you serve this, it will be good. This is the best chili I've ever had!

Enjoy!

Wednesday, October 1, 2014

DIY tutorial - galvanized letters

I've been in love with the Anthropologie Zinc Letters since forever, but at $18 a pop, it wasn't practical for Judson's room.
 
 
I had honestly kinda moved past them, because like I said- I couldn't swallow the cost, when I stumbled upon a Pinterest tutorial to copy them. It was like fate! Ha!
 
So, I ran over to HobLob and got all the supplies, and went to work. I am so thrilled with the results!
 
DIY galvanized letters

I decided to do a quick tutorial, because this is SUPER easy and I think it really does look like the Anthro letters.
 
Alright, so let's start.

First, you're going to need:
Paper mache letters (HobLob for $2.99/ea)
Black acrylic paint
Silver metallic acrylic paint
Paint brush
 
The first step is to take off all the price tag stickers. Please do this. You will thank me later.
 
Next, paint all the letters black. Make sure to get the front and sides. Then let them dry completely (I let them dry overnight).
 
DIY galvanized letters

Next step is to go over the black with a thin layer of the silver metallic paint. Less is more here. You can always add more paint, but you can't take it off. The goal is to use long brush strokes to give the appearance of metal.
 
You can see my technique here. I just started on 1 side and went up/down and kept the brush strokes going the same way.
 
DIY galvanized letters
 
You can see the brush strokes that I was talking about in this picture.

DIY galvanized letters

TA DAA!! That's it!

DIY galvanized letters

What do y'all think?? I can't wait to get these up on the walls in Mr. Judson's room. And the best part is they're super light, so you can just use command strips to adhere them to the wall.

Friday, July 11, 2014

Recipe - easy egg white breakfast sandwich

If you follow me on Instagram (@KateSoko), then you know we're having a little family detox over here. I've made this egg white sandwich pretty much every day this week for breakfast, and it was just too easy and delicious not to share. 


Directions
1) spray inside of coffee mug with non-stick spray
2) crack 1 egg and 3 tbsp. egg whites into mug, and stir around
3) add in desired "toppings" (I've done cooked bacon, diced ham, spinach, onion, cheese)
4) mix all ingredients together
5) microwave for 2 minutes
6) while mug is cooking, pop your english muffin into the toaster
7) when mug is done, slide the contents onto your toasted english muffin. I like to add a bit of salsa to the top, too. Yum!

It's that easy. And the toppings are endless!

Enjoy!

Friday, April 11, 2014

Easter Brunch Ideas

Happy Friday!!! I hope y'all have had a wonderful week so far. I'm so so looking forward to a fun-packed weekend, starting with a yummy lunch with my sister today!! Yay!

We're having some family over after Easter service, and I've been thumbing through my brunch recipes trying to decide on the perfect menu.

I've narrowed it down to these options, so I thought I'd share them along with the corresponding recipes...
 
Easter brunch ideas
My french toast casserole is seriously bomb. And the best part is it's EASY! You can make it, pop it in the oven and get on to the egg hunting!
As a kid, my parents made this no flip pancake nearly every weekend. Its so so good. It requires a bit more prep (sifting flour- ick!), but it's sooooo delicious! For the 7 of us, I'll probably make two double batches. It's that good.

Easter brunch ideas
 
Ingredients (for a single batch, which feeds 2-3 people)
6 eggs
1 cup sifted flour
1 cup milk
4 tbs. melted butter
1/2 tsp. salt
 
Directions
1) Preheat oven to 400.
2) Beat eggs until well blended.
3) Slowly add flour while still blending.
4) Add salt, milk and butter.
5) Pour into greased 9x9 pan (if you double the recipe, you need to put it in a 9x13).
6) Bake at 400 for 20 minutes.
7) Let sit for 5 minutes. Serve with melted butter, powdered sugar and syrup. YUM!!
  
Easter brunch ideas
PS- look at these old school pictures and our OG oven! Woof!

I've been addicted to poached eggs over buttered toast lately. The combo of the runny yolk and butter seriously can't be beat! Poached eggs are suuuuuper easy to make, but they do require attention, so making for a group might not be the best idea.
 
Easter brunch ideas
Here's a quick tutorial on how to make poached eggs.

First- bring water to a boil in a frying pan.
Once the water is boiling, crack desired number of eggs directly into the water and let it cook in the boiling water. You can make multiple eggs at a time- I've made up to 3 in a small frying pan.
While your eggs are cooking, put bread in the toaster. Butter once done.

Easter brunch ideas

Next- after a few minutes (maybe 3-5), scoop the eggs out of the water with a slotted spoon, and lay on top of buttered toast.
 
Easter brunch ideas
 
That's it! Your goal is to keep the egg runny. (I clearly didn't accomplish that this time because the eye doctor called twice while it was boiling- ack!) Sooo yummy!!!

Easter brunch ideas

My next option are these scrumptious and simple ham and egg cups. I feel like these would be a good "side" item to go with one of the above (probably not the poached eggs, too much egg?).  

Easter brunch ideas
via
I haven't actually made these yet. They look pretty easy though, and I think you could add hashbrowns to the bottom, instead of serving on the side. Here's the original recipe.
 
What are y'all planning on making?? Any good ideas? I love a good brunch recipe!!!
 

Friday, April 4, 2014

Easter Egg Explosion

Easter is one of my favorite holidays to decorate for. Not sure if it's because it coincides with spring cleaning (and we all know I love a good deep cleaning) or if it's just the general uplifting feeling that spring brings- sunshine, warm temps, flowers, bright colors, etc. Either way- I'm totally game!

This year I decided to spruce up my Easter decor and try to do it on a budget. I think I nailed this one. 

Easter egg explosion at Casa de Sokolewicz...

I went to the Dollar Store and grabbed about 8 tubes of Easter eggs (4 of the pastel colors and 4 of the brighter colors, 24 eggs in each tube). I'm no math major, but that's like 200+ Easter eggs.
 
The Dollar Store eggs are awesome for crafting because they have holes on both ends, so you can easily string them.

Easter egg garland
 
I literally took 24 eggs, strung them on fishing line and hung them on my little nails on my mantel and called it a day. This little pop of color really does make a huge impact in our family room!
 
Easter egg decorations
 
For each holiday/season, I fill up this vase on our dining room table with various items. I love that its one of the first things you see when you walk in our front door, and it just sets the tone for the entire house. I actually got those little wooden baskets at Emporium Pies (they put their to-go slices in them- how cute, huh??), but I found similar ones here. Just fill them with some Easter grass and you've got some adorable placecards or, in my case, a little Easter goodie for Easter brunch! (more on that later)
 
Easter egg wreath

I can't even count how many times I've said this, but no holiday/event/season is complete without a wreath! I'm seriously in love with this one. I first hot glued eggs (probably 70-80 eggs, y'all) to a foam wreath form. Then just used some Easter grass to fill in the spots where you could see the wreath form. There weren't that many spots, but I had to add some more to even it out. I'm so glad I made this guy. Love it!

Easter chalkboard | He is Risen
 
I took a little LBG inspiration on this chalkboard, but I'm really happy with the way it turned out!
 
I'll be back next week with Jacob's Easter basket and some ideas for a yummy Easter brunch!
 
Cheers!


Tuesday, March 25, 2014

How To Make A Wine Rack Above The Fridge

You know that useless cabinet above your fridge that's too far back to access easily? So you either have crap in there or nothing at all? Yeah, we all have one.

I decided to build a wine rack in ours. I know storing wine above the fridge isn't the ideal spot, but our fridge emits little to no heat, and that space is so useless, that I just had to do it. I think most people don't advise storing wine on top of the ACTUAL fridge (because it shakes the wine, and it is warm).

wine storage
 
Anyways- if you're like me and think this is a good idea, read on... (also, please note: this tutorial is for a cabinet that measures 12" deep, 34" wide and 11" tall.)

First, remove the doors and hardware. Our cabinet had a bar in the middle of the space, which was literally held in by 2 small wooden pegs. Josh easily snapped them off/sawed them off with a handsaw.

Next, we primed and painted the inside because we were painting the rest of the cabinets and this was part of the remodel. 

Next, you need to purchase this wine rack kit (actually, go ahead and order it as soon as you decide you're doing this project, so it arrives ASAP). We exhausted ALL our options to actually build this ourselves, but with a rectangle space like this, it's nearly impossible to make with the tools we have.

Once your kit arrives, measure and saw off any excess. I wanted the middle "braces" to be somewhat hidden behind the cabinet lip, so Josh sawed off about 1-2" from the width of those.

Next, if applicable, prime and paint the wood. I did 1 coat of each and was satisfied with the outcome.

Next, install and stack yo wine!!!

I looooove the way this turned out, and I looooove that our wine isn't just sitting around taking up space on a countertop.

If you try this, please please please let me know how it goes!

Linking up with: The Dedicated House, Hope Studios, A Savory Feast, Lewis Lane Designs

Friday, March 21, 2014

Emily's "Very Hungry Caterpillar" Baby Shower

I had the privilege of co-hosting my sister-in-law's baby shower, with Alicia at Adventures at Naptime, and oh my gosh! Everything turned out so cute, so perfect and so delicious!!!

Since they aren't finding out the gender ahead of time, we decided to do a "Very Hungry Caterpillar" themed shower. It's a great theme for either gender, and really easy to play off of. Tons of fun colors, foods, shapes and of course an adorable caterpillar and butterfly!

I was also lucky enough to work with Tiny Prints again for the invitations! Isn't this invitation so cute?!

Very Hungry Caterpillar
 
It's actually a moving announcement postcard, but I fell in love with the Eric Carle-esque pineapple and loved the idea of sending postcards! I love finding gems like this and re-purposing to meet my needs.

For the actual décor, we decided to really play-up the caterpillar theme with tons of bright colors and, of course, a giant caterpillar!

Very Hungry Caterpillar

I made this using paper lanterns, twine and construction paper for the eyes. I think it cost less than $10 total and it made a HUGE statement! It's kinda hard to tell by the pictures, but this sucker was at least 8 feet long!

I also made a fruity banner to hang above the food table. This turned out really cute, too! I literally free-handed the different fruit shapes on construction paper and then used a stencil for the letters. Again, super cheap and simple, but so cute!!!

Very Hungry Caterpillar
 
It's kinda hard to see in the picture, but for food- I made yummy fruit kabobs (which somewhat resembled caterpillars), a vegetable platter with lots of fun colors, my (errr...Rachael Ray's) famous swiss bacon dip and served my sister-in-law's favorite pasta salad from Eatzi's! All the food was a big hit and it was the perfect variety for an afternoon shower.
 
Alicia made this fabulous diaper cake.
 
Very Hungry Caterpillar
 
LOOK how adorable it is! And it's super legit- with lots of diapers (obv), burp cloths, and toys in there! She's got an awesome tutorial on her blog, make sure you check it out.
And last, but certainly not least. The wreath. No party is complete without a wreath, and this one stole the show! I literally just hot glued a ton of pom poms to a foam wreath, tied some pretty chevron ribbon to the top and called it a day.

Very Hungry Caterpillar

I love throwing showers, and this one will always hold a special place in my heart. I cannot wait to meet my FIRST niece/nephew, and I cannot wait to see my brother/sister-in-law as parents. They are going to me amazing!


Thanks again to Tiny Prints for supplying the beautiful invitations. If y'all are hosting a shower, you should definitely check out their selection! Baby or wedding- they've got you covered in the shower department!

And also a big thanks for Alicia for hosting this shower with me! She's a hilarious mom of three with stories for days- y'all should really follow her blog!

Hope y'all have a wonderful weekend! Cheers!

Linking up with: A Savory Feast, Hope Studios, Lewis Lane Designs

Monday, March 17, 2014

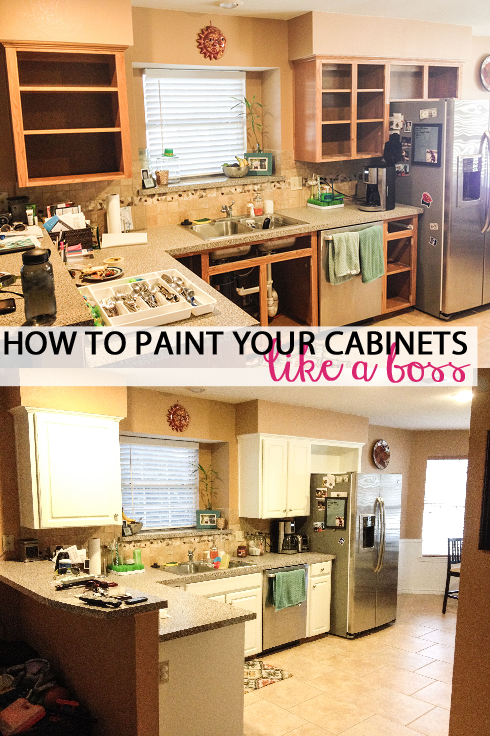
How To Paint Your Cabinets [like a boss]

So it finally happened. I talked Josh into painting our kitchen cabinets! And we actually did it!! Yayy!!!!

LOOK how good it turned out... Ahh I'm just so obsessed with this room now!

How to paint your cabinets

The process is very time consuming, tedious and messy, but it is not hard. I repeat it is not hard. In all seriousness, I probably wouldn't make this your first home improvement project, but you can definitely do it!!!

I'm going to give you step-by-step instructions on how we did it. But let me start off by saying I am no DIY expert. In fact, my dad (and my better judgement) told me not to do this. Hahahah!! There are a million tutorials online, all with a different process and materials. This is how WE did it. 

And also keep in mind that we have a toddler to wrangle care for, so most of the work was done during naptime and after he went to bed. 

From start to finish, this took us 14 days. 6 of which were drying days during which I did nothing. Sooo...I'm no math major, but I think that's 8 days of actual work (right??)...not bad for a remodel that will seriously turn your kitchen (or bathroom) from drab to fab!

In terms of budget, we spent around $150 total for all the supplies and paint. Again, a total score! Considering buying new cabinets or having someone else do them would cost a pretty penny $$.

Alright- what you've all been waiting for. The tutorial...

Step 1
Gather all your supplies. 
Here's a list of what we used:
Wood filler (Elmer's Wood Filler Max)
Mouse sander (Black & Decker)
80 grit sandpaper
Deglosser (Klean Strip Sander Deglosser)
Paintable white caulk
Primer (Zinsser 1-2-3)
2" angled paintbrush
Foam roller
Paint (Benjamin Moore Advance Paint in "cloud cover" in satin finish)
Various screwdrivers
Painters tape
Drop cloths
Putty knife

Step 2
Remove doors/drawers and all the hardware. Make sure you mark each cabinet opening and corresponding door/drawer and all the hardware, so you can install it correctly when you're done! We put tiny pieces of masking tape in each cabinet and then wrote the corresponding number under each door in the garage. And just piled all the hardware next to the number. 

How to paint your cabinets

How to paint your cabinets

Step 3
If you're replacing the hardware or if you have any nicks/holes in your cabinets, you'll need to fill the holes with wood filler and use a putty knife to scrape the excess off. Then let it dry.

Step 4
Sand, sand, sand. We used 80 grit sandpaper with a mouse sander and spent about 20 minutes on each door. Get in all the grooves and edges. You don't have to get every last bit of varnish off, but you want to rough it up real good. Sawdust will get everywhere. Plan accordingly. We sanded all the doors/drawers outside in the grass. When we sanded the cabinet boxes inside, I shut the door to the kitchen and put a towel under it, and used a big plastic drop cloth to close up the huge opening to the family room. Thankfully the weather was gorgeous that day, so I was able to turn off the ac/heater while sanding and Jacob spent most of the day outside. It was a MESS! But after lots of sweeping and vacuuming, it was cleaned up pretty quickly. Honestly. I suggest doing this part when the weather is nice and you can be outside. This is the messiest part.


How to paint your cabinets
 
How to paint your cabinets

Step 5
Degloss. I used a TON of old rags, squeezed a good amount on the rag, and wiped down the cabinets thoroughly after they were sanded. I wore gloves and replaced them a couple times throughout the process. You want to clean off all the sawdust and make a nice even surface for the primer to adhere to. We were able to sand and degloss all the doors, drawers and cabinet boxes in 1 day. I was shocked by that!

How to paint your cabinets

Step 6
Caulk. We had some separation between the cabinets and the walls, so we used a hefty amount of caulk to seal the gaps. P.S. Read the instructions to find out how long you should wait before painting. The stuff we got dried in 15 minutes!
 
Step 7
Prime. We started with the back of the doors, thinking that if when we turn them over to do the front and it scuffs a bit, it'll be the BACK not the front. ¿Comprende? Then when we were done with the backs and drawers, we moved to the cabinet boxes. When you're priming, you want to start with the angled paintbrush and get primer in all the groves and spread the primer around. Then take the foam roller and roll over the entire surface. You want to make an even surface. 

How to paint your cabinets

How to paint your cabinets

Step 8
Painting! Once your primer is dry (we waited at least 24 hours) you can start painting!! We did two coats, using the same technique as we did with primer. After painting the second coat on the back side, we let the doors sit for a full day before flipping them. After painting the second coat on the front side, when the doors and drawers were completely done, we let everything sit for 5 full days. You need to read your paint to see how long you should wait. This is so important- you really don't want to ruin all your hard work!

Step 9
After 5  l o n g  days of waiting, we re-installed all the hardware and put all the doors back on. This was an OMG moment, for sure!!!

How to paint your cabinets

How to paint your cabinets

I really wish I had better before pictures. I thought I had some from when we first moved in, but I can't find them?!?!

Anyways- I hope this post includes enough details and tips/tricks. If you have any questions, just post them in the comment section and I'll answer them as best I can!!!

Now that our cabinets are all re-installed, the doors/drawers do stick a little bit. I've heard that it could take up to 9 months before everything is seriously hardened. We'll see! I'll try to update this post in the future, once I feel like its done.

Good luck!!!!

Linking up with: Cherished Handmade Treasures, Not Just a Housewife, Hope Studios, Remodelaholic, House of Rose, Living Well Spending Less, The Dedicated House, A Savory Feast, Lewis Lane Designs

Tuesday, February 25, 2014

Toddler food idea - english muffin pizzas

Hi, I'm Kate. I'm a pizzaholic. Seriously, its a problem. But it didn't really become obvious until I posted two pizza recipes back to back. What the heck!?
 
This is more of an idea post than an actual recipe post. Jacob LOVES pizza, but its not really feasible for me to make a whole pizza (sauce and all) during the day. This is the perfect solution.
 
 
English muffin pizzas! You literally just layer the sauce, cheese and toppings right onto the English muffin and pop it in the oven for 10-15 minutes.
 
 
My only piece of advice is to toast the English muffins before putting everything on them and baking it. Toasting them ahead of time helps to cook them thoroughly and they turn out nice and crunchy!

Yum!!!

Saturday, February 22, 2014

Homemade margherita pizza

Homemade pizza is a very popular meal in our house. We've evolved over the years from frozen store-bought pizza, to basic homemade, to full-blown pizza. We still haven't tackled the crust, but we probably will soon because I don't really care for the store-bought stuff.

 
Anyways...here's what we do. 


Start with the crust. Pre-heat oven to 400° and spread out the dough on a cookie sheet. 


Cook for 10ish minutes, or until the crust is nice and brown. Like so-


While the crust is cooking, you can make your sauce. We use these whole tomatoes (San Marzano is the best).


Pour the tomatoes in a bowl and mix around. Since they're whole tomatoes, you kinda gotta mash them up with your hands. Then add in 3-4 smashed garlic cloves, and 4-5 fresh basil leaves. That's it!

Once your crust is done, transfer it to a pizza stone or a rack. We happen to have 2 spare oven racks, so we use those!

Then layer your toppings. Pour a healthy amount of sauce on the crust, add 6-7 fresh basil leaves (covering the top), and then rip apart some fresh mozzarella. We generally use an entire ball of mozzarella per pizza. 

Then put the pizza back in the oven for another 10ish minutes or until the cheese is melted. 


That's it! So simple and delicious! If we tackle the crust- I'll let you know! ;)