Pages

Monday, March 31, 2014

Our Day Out With Thomas 2014

Oh. My. Gosh.
I don't even know where to start. We had such a fun Saturday!
 
After Jacob woke up from his nap, we headed to Grapevine to catch a ride on Thomas the Train.

Day Out With Thomas

I had been hyping this up the whole week, but I don't think Jacob actually understood what I was talking about until he saw Thomas. His eyes lit up and a huge smile came over his face. My heart could literally explode, just thinking about his happiness in that moment.

Day Out With Thomas

We got our tickets at will call and proceeded to the boarding line. 
 
Day Out With Thomas
 
The ride before us pulled into the station while we were waiting, so we got to see Thomas in all his glory. All the kids cheered and yelled, it was seriously so cute.

Day Out With Thomas

We hardly waited at all and the train took off on schedule. (such a plus when dealing with this many kids)

Day Out With Thomas

Jacob had so much fun waving to all the people at the station and along the ride (which was only 25 minutes, by the way- perfect length!).

Day Out With Thomas

The Conductor came by and gave all the kids a Junior Engineer Certificate and said hello. And we sang songs and took too many pictures.

Day Out With Thomas
 
We really had such a fun time! We'll definitely do it again next year.

Day Out With Thomas

After the ride was over, we deboarded and attempted a few pictures in front of Thomas. Someone wanted to run around.

Day Out With Thomas

Day Out With Thomas

Friday, March 28, 2014

Pie Date

My sister and I (along with the J-bird) went on a pie date this morning to a yummy little hole in the wall, Emporium Pies, in McKinney. Apparently they have an original location in Bishops Arts, which is probably equally charming.

Emporium Pies McKinney, TX
via
This place is so cute! From the "no soliciting" sign on the door (which reads: No Soliciting Unless You're Selling Thin Mints), to the antique plates and silverware they serve their pies on, to the June Cleaver-esque baristas.
 
All their pies are made from scratch with all-natural ingredients. They have 7 pies at any given time. Some are always available and some are seasonal. 

Emporium Pies McKinney, TX

We shared the Dr. Love and Smooth Operator. Both were rich and delicious. The filling and the crust were equally tasty. 

Emporium Pies McKinney, TX

Slices are $5-6 and whole pies are $30, although they recommend you pre-order whole pies.
 
They also have an amazing selection of coffees, lattes, cappuccinos and hot chocolate! Many of their syrups are homemade. AND they have a secret menu- ask for it when you go!

We had a blast, and someone really enjoyed all the sugar!

Emporium Pies McKinney, TX
 
I brought home a slice of most of the pies (good Lord!), so I'll have to update this post with our thoughts. 

If you've got a little time on your hands and a sweet tooth, you gotta visit this place. 

Cheers! Happy Friday!

Tuesday, March 25, 2014

How To Make A Wine Rack Above The Fridge

You know that useless cabinet above your fridge that's too far back to access easily? So you either have crap in there or nothing at all? Yeah, we all have one.

I decided to build a wine rack in ours. I know storing wine above the fridge isn't the ideal spot, but our fridge emits little to no heat, and that space is so useless, that I just had to do it. I think most people don't advise storing wine on top of the ACTUAL fridge (because it shakes the wine, and it is warm).

wine storage
 
Anyways- if you're like me and think this is a good idea, read on... (also, please note: this tutorial is for a cabinet that measures 12" deep, 34" wide and 11" tall.)

First, remove the doors and hardware. Our cabinet had a bar in the middle of the space, which was literally held in by 2 small wooden pegs. Josh easily snapped them off/sawed them off with a handsaw.

Next, we primed and painted the inside because we were painting the rest of the cabinets and this was part of the remodel. 

Next, you need to purchase this wine rack kit (actually, go ahead and order it as soon as you decide you're doing this project, so it arrives ASAP). We exhausted ALL our options to actually build this ourselves, but with a rectangle space like this, it's nearly impossible to make with the tools we have.

Once your kit arrives, measure and saw off any excess. I wanted the middle "braces" to be somewhat hidden behind the cabinet lip, so Josh sawed off about 1-2" from the width of those.

Next, if applicable, prime and paint the wood. I did 1 coat of each and was satisfied with the outcome.

Next, install and stack yo wine!!!

I looooove the way this turned out, and I looooove that our wine isn't just sitting around taking up space on a countertop.

If you try this, please please please let me know how it goes!

Linking up with: The Dedicated House, Hope Studios, A Savory Feast, Lewis Lane Designs

Monday, March 24, 2014

Happy birthday, Josh!

Josh turned 33 today and we have had a fabulous 5-day weekend celebrating!

His birthday conveniently falls around the beginning of March Madness, so being the basketball fanatics that we are, he took days off work to watch. 

We have had so much fun, eating, drinking, napping, cheering, etc. 

Thursday and Friday were literally spent on the couch watching basketball ALL day, eating yummy food (think buffalo wings and pizza), day drinking and freaking out over all the close games and OT. I seriously can't remember another tournament with so many good games!! We were super sad to see our Blue Devils lose in the first round.

On Saturday morning, we took Jacob for his first haircut.


I think my heart broke a bit after it was done. He looks so old!!! Tear!


SaturDAY was spent watching more hoops, naptime for everyone and an early dinner with Josh's family. 


My parents came to town Sunday for lunch and cake.
Which was followed by a 2.5 hour nap and basketball. (noticing a theme yet??? LOL)

On his actual birthday (today), we did more of the things he loves. I made a delicious breakfast with potato, egg, bacon and cheese breakfast tacos and fresh OJ. We went to Home Depot (his favorite store), bought flowers and planted them. Went for a family jog to the park and played with Jacob. Had a yummy happy hour in our backyard. And had Pei Wei for dinner. Whew! I'm tired from just typing that! Haha!


Happiest birthday to my amazing husband, best friend and partner in crime. I am so lucky to have you! I hope you had a good weekend. 

Friday, March 21, 2014

Emily's "Very Hungry Caterpillar" Baby Shower

I had the privilege of co-hosting my sister-in-law's baby shower, with Alicia at Adventures at Naptime, and oh my gosh! Everything turned out so cute, so perfect and so delicious!!!

Since they aren't finding out the gender ahead of time, we decided to do a "Very Hungry Caterpillar" themed shower. It's a great theme for either gender, and really easy to play off of. Tons of fun colors, foods, shapes and of course an adorable caterpillar and butterfly!

I was also lucky enough to work with Tiny Prints again for the invitations! Isn't this invitation so cute?!

Very Hungry Caterpillar
 
It's actually a moving announcement postcard, but I fell in love with the Eric Carle-esque pineapple and loved the idea of sending postcards! I love finding gems like this and re-purposing to meet my needs.

For the actual décor, we decided to really play-up the caterpillar theme with tons of bright colors and, of course, a giant caterpillar!

Very Hungry Caterpillar

I made this using paper lanterns, twine and construction paper for the eyes. I think it cost less than $10 total and it made a HUGE statement! It's kinda hard to tell by the pictures, but this sucker was at least 8 feet long!

I also made a fruity banner to hang above the food table. This turned out really cute, too! I literally free-handed the different fruit shapes on construction paper and then used a stencil for the letters. Again, super cheap and simple, but so cute!!!

Very Hungry Caterpillar
 
It's kinda hard to see in the picture, but for food- I made yummy fruit kabobs (which somewhat resembled caterpillars), a vegetable platter with lots of fun colors, my (errr...Rachael Ray's) famous swiss bacon dip and served my sister-in-law's favorite pasta salad from Eatzi's! All the food was a big hit and it was the perfect variety for an afternoon shower.
 
Alicia made this fabulous diaper cake.
 
Very Hungry Caterpillar
 
LOOK how adorable it is! And it's super legit- with lots of diapers (obv), burp cloths, and toys in there! She's got an awesome tutorial on her blog, make sure you check it out.
And last, but certainly not least. The wreath. No party is complete without a wreath, and this one stole the show! I literally just hot glued a ton of pom poms to a foam wreath, tied some pretty chevron ribbon to the top and called it a day.

Very Hungry Caterpillar

I love throwing showers, and this one will always hold a special place in my heart. I cannot wait to meet my FIRST niece/nephew, and I cannot wait to see my brother/sister-in-law as parents. They are going to me amazing!


Thanks again to Tiny Prints for supplying the beautiful invitations. If y'all are hosting a shower, you should definitely check out their selection! Baby or wedding- they've got you covered in the shower department!

And also a big thanks for Alicia for hosting this shower with me! She's a hilarious mom of three with stories for days- y'all should really follow her blog!

Hope y'all have a wonderful weekend! Cheers!

Linking up with: A Savory Feast, Hope Studios, Lewis Lane Designs

Monday, March 17, 2014

How To Paint Your Cabinets [like a boss]

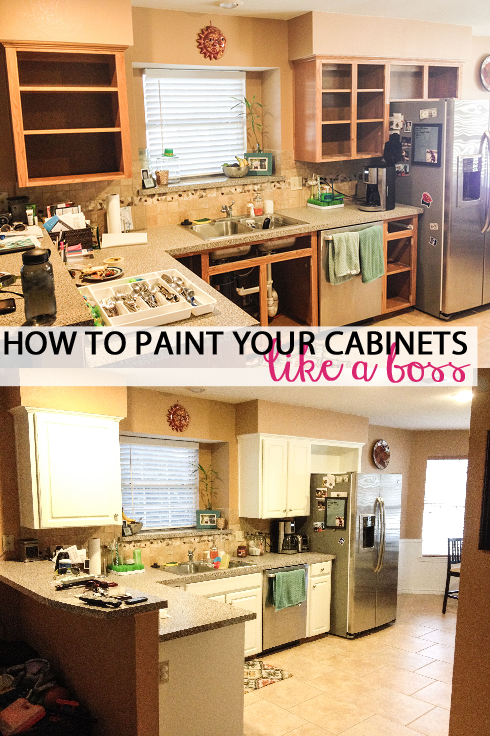
So it finally happened. I talked Josh into painting our kitchen cabinets! And we actually did it!! Yayy!!!!

LOOK how good it turned out... Ahh I'm just so obsessed with this room now!

How to paint your cabinets

The process is very time consuming, tedious and messy, but it is not hard. I repeat it is not hard. In all seriousness, I probably wouldn't make this your first home improvement project, but you can definitely do it!!!

I'm going to give you step-by-step instructions on how we did it. But let me start off by saying I am no DIY expert. In fact, my dad (and my better judgement) told me not to do this. Hahahah!! There are a million tutorials online, all with a different process and materials. This is how WE did it. 

And also keep in mind that we have a toddler to wrangle care for, so most of the work was done during naptime and after he went to bed. 

From start to finish, this took us 14 days. 6 of which were drying days during which I did nothing. Sooo...I'm no math major, but I think that's 8 days of actual work (right??)...not bad for a remodel that will seriously turn your kitchen (or bathroom) from drab to fab!

In terms of budget, we spent around $150 total for all the supplies and paint. Again, a total score! Considering buying new cabinets or having someone else do them would cost a pretty penny $$.

Alright- what you've all been waiting for. The tutorial...

Step 1
Gather all your supplies. 
Here's a list of what we used:
Wood filler (Elmer's Wood Filler Max)
Mouse sander (Black & Decker)
80 grit sandpaper
Deglosser (Klean Strip Sander Deglosser)
Paintable white caulk
Primer (Zinsser 1-2-3)
2" angled paintbrush
Foam roller
Paint (Benjamin Moore Advance Paint in "cloud cover" in satin finish)
Various screwdrivers
Painters tape
Drop cloths
Putty knife

Step 2
Remove doors/drawers and all the hardware. Make sure you mark each cabinet opening and corresponding door/drawer and all the hardware, so you can install it correctly when you're done! We put tiny pieces of masking tape in each cabinet and then wrote the corresponding number under each door in the garage. And just piled all the hardware next to the number. 

How to paint your cabinets

How to paint your cabinets

Step 3
If you're replacing the hardware or if you have any nicks/holes in your cabinets, you'll need to fill the holes with wood filler and use a putty knife to scrape the excess off. Then let it dry.

Step 4
Sand, sand, sand. We used 80 grit sandpaper with a mouse sander and spent about 20 minutes on each door. Get in all the grooves and edges. You don't have to get every last bit of varnish off, but you want to rough it up real good. Sawdust will get everywhere. Plan accordingly. We sanded all the doors/drawers outside in the grass. When we sanded the cabinet boxes inside, I shut the door to the kitchen and put a towel under it, and used a big plastic drop cloth to close up the huge opening to the family room. Thankfully the weather was gorgeous that day, so I was able to turn off the ac/heater while sanding and Jacob spent most of the day outside. It was a MESS! But after lots of sweeping and vacuuming, it was cleaned up pretty quickly. Honestly. I suggest doing this part when the weather is nice and you can be outside. This is the messiest part.


How to paint your cabinets
 
How to paint your cabinets

Step 5
Degloss. I used a TON of old rags, squeezed a good amount on the rag, and wiped down the cabinets thoroughly after they were sanded. I wore gloves and replaced them a couple times throughout the process. You want to clean off all the sawdust and make a nice even surface for the primer to adhere to. We were able to sand and degloss all the doors, drawers and cabinet boxes in 1 day. I was shocked by that!

How to paint your cabinets

Step 6
Caulk. We had some separation between the cabinets and the walls, so we used a hefty amount of caulk to seal the gaps. P.S. Read the instructions to find out how long you should wait before painting. The stuff we got dried in 15 minutes!
 
Step 7
Prime. We started with the back of the doors, thinking that if when we turn them over to do the front and it scuffs a bit, it'll be the BACK not the front. ¿Comprende? Then when we were done with the backs and drawers, we moved to the cabinet boxes. When you're priming, you want to start with the angled paintbrush and get primer in all the groves and spread the primer around. Then take the foam roller and roll over the entire surface. You want to make an even surface. 

How to paint your cabinets

How to paint your cabinets

Step 8
Painting! Once your primer is dry (we waited at least 24 hours) you can start painting!! We did two coats, using the same technique as we did with primer. After painting the second coat on the back side, we let the doors sit for a full day before flipping them. After painting the second coat on the front side, when the doors and drawers were completely done, we let everything sit for 5 full days. You need to read your paint to see how long you should wait. This is so important- you really don't want to ruin all your hard work!

Step 9
After 5  l o n g  days of waiting, we re-installed all the hardware and put all the doors back on. This was an OMG moment, for sure!!!

How to paint your cabinets

How to paint your cabinets

I really wish I had better before pictures. I thought I had some from when we first moved in, but I can't find them?!?!

Anyways- I hope this post includes enough details and tips/tricks. If you have any questions, just post them in the comment section and I'll answer them as best I can!!!

Now that our cabinets are all re-installed, the doors/drawers do stick a little bit. I've heard that it could take up to 9 months before everything is seriously hardened. We'll see! I'll try to update this post in the future, once I feel like its done.

Good luck!!!!

Linking up with: Cherished Handmade Treasures, Not Just a Housewife, Hope Studios, Remodelaholic, House of Rose, Living Well Spending Less, The Dedicated House, A Savory Feast, Lewis Lane Designs

Wednesday, March 12, 2014

Recent lake trip

My parents recently bought a house on a lake about an hour away, which is such a blessing to me because they've been 3+ hours away since I moved to Dallas 7 years ago. Before Jacob, we were able to go to Austin and visit them a lot, but now it's kinda hard! Soo I'm beyond grateful they moved closer. And now we have a fun place to getaway to during the week!

My sister, Jacob and I drove out there this week and spent the afternoon playing. It was a really great day. Just what we all needed- some quality family time! And the weather was just perfect!

Here are some pictures from our trip.


Wednesday, March 5, 2014

Jacob - 21 months

 
Age: 21 months
Height: we don't go back until he's 2!
Weight: we don't go back until he's 2!
Milestones: His vocabulary is getting better- he knows most animals and their corresponding sounds, he know lots of daily words (helicopter, airplane, car, truck, etc.).
Sleep: It still good! Nighttime we get anywhere from 11-13 hours, and naptimes are kinda all over the place. If he wakes up early (before 8ish), he usually goes down for a nap in the morning and sleeps 1.5-2 hours. If he wakes up after 8, he takes an afternoon nap for 1-2 hours. We just kinda go with the flow.
Eating: He's still not eating very well, but I'm approaching meals differently now. Instead of forcing him to eat at every meal, I offer him food and just kinda let him graze. He generally eats MORE this way, which is the goal- right?!
Clothes size: 2T, but starting to buy warmer weather clothes in 3T!
Diaper size: Size 5 Cruisers
Teeth: 12 total, and I think his canines are starting to move now.
Best Moment: Valentine's Day was a lot of fun!
Worst Moment: Can't really think of anything??
Favorite toy: Still really loving all his trucks!
Looking forward to: Josh's birthday is coming up, so we'll be doing a few fun things for that!

Sidebar: I decided at 4pm yesterday that I was giving up social media for Lent. Yes, you read that right- no social media for 40 days. I know its totally crazy, and its going to be so so hard for me, but its been weighing on my heart for awhile and I knew it was the right thing to do. I need to spend more time with my boys, and remember how to live in the moment.


Besides a few "previously scheduled" blog posts (like the kitchen reveal, recap of my sister-in-law's baby shower, and these monthly updates), I won't be on Facebook, Instagram or this blog (or any blogs- for that matter!).

I hope y'all understand, and I hope you can find something meaningful to give up for Lent as well! Cheers!

Tuesday, March 4, 2014

Life lately

Happy Tuesday, y'all! Having a good week so far? I just realized I haven't updated y'all lately on stuff, so here goes it...

If you follow me on Instagram (@KateSoko) then you already know we started painting our kitchen cabinets over the weekend. I'm kinda compulsive when it comes to things like this. If I think too much about it, I'll talk myself out of it and Josh will come up with a good excuse not to do it. Soo I just gotta jump in! It's actually going really really good! We've sanded, primed and put 1 coat of paint on the cabinet boxes.


Looks pretty good, huh?! It really lightens up the space, which was my goal. 

I plan on doing a detailed tutorial after it's all said and done. Don't worry! ;)

I'm co-hosting a baby shower for my sweet sister-in-law (and my FIRST niece/nephew (they aren't finding out the sex!)) this upcoming weekend. So I'm kinda swimming in too many ideas for that. Pinterest is the devil, I swear!!

Schatzi's FIFTH birthday is also this Saturday. I cannot believe we've had her for 5 years! Gah! We'll def do something fun for her when I get home from the shower. 

All my kitchen stuff is living in the dining room and guest bedroom at the moment, so I have about ZERO motivation to cook. Ack!

This Texas weather has got me in a mega funk. It was so beautiful on Saturday. Nearly 80°, tons of sun, a nice breeze. Then Sunday the high was 40° and it was sleeting on/off all day! What the heck?! Over it!!!!

I think that's it. For now. Haha! I'll be back later this week with a yummy St. Patrick's Day treat!

Y'all have a good week! Cheers!